DISCLAIMER: FIRSTLY -- We are not professionals.....not even close to being experts on woodworking or building in general. Heck, we aren't even that good at being amateurs. We just had a passion for a project and the determination to see it through. SECONDLY -- We never meant this project to be canon to a specific doctor or really canon at all. It was all custom created at the whim of what our son wanted on his TARDIS. THIRDLY -- We don't have the money to put thousands into a TARDIS build. We build the best TARDIS we could as inexpensively as we could. We only splurged on a few key items.
This adventure all began when we found out our 16 year old son was graduating a year early and is a senior this year. We are so proud of him! Our son has Addison's Disease, diabetes, and several other complications arising from that. He has been medically homebound and going to school online for his entire high school career. He is an awesome guy (yes I'm biased) and never asks for much of anything.
We began discussing getting senior portraits done. He wanted to do something special that had never been done around here before. Something different. Something amazing. It was then that he decided he would like to have a TARDIS in his pictures. What a great idea!!!
I actually looked into finding one to rent, but there aren't any around here. In a flash of inspiration, I announced to my husband, "Let's build a TARDIS!" My husband is always a good sport about everything, so he simply agreed. Hence, the idea was born. I know how bad we are at procrastination, so I set a time frame of two months to have our TARDIS done. Now..where to start?

Meet our template. My son's favorite doctor is Matt Smith, and he loves Matt Smith's TARDIS. He wanted his to be modeled after #11's.
There are great websites to get ideas, such as www.tardisbuilders.com. We researched all of them for hours on end to figure out how to best go about creating our time machine. We had a table saw, a skill saw, lots of C clamps, and tons of enthusiasm. We were ready.

Originally, our idea was to build the TARDIS, use it to take the senior pictures, and then put it in the backyard by our pool. To that end, the base wood was pressure treated to withstand the elements. The slant on the top of the boards was cut using our table saw. From there, the four corner pieces went up.
Now, there are official TARDIS blue prints out there. With all the layering of wood that was done, the build would have cost at least triple what we spent, if not quadruple. The layering is beautiful, but honestly, to us, not necessary. We achieved the same effect doing the corner posts with one 2 x 4 and one 2 x 2. We filled in the seam with wood putty and voila!
We saved a ton on wood by ripping down bigger boards on the table saw to make the trim boards. Almost all of the trim work started out as a 2 x 4 or a 1 x 4. We kept every scrap and used it somewhere else. We started the build with about $150.00 worth of wood.

Our only regret is that instead of using plywood, we built our TARDIS with particle board on the sides. If we had to do it again, we would spend the extra dollars to get the plywood. The upside? I mudded the walls with wood filler, and it gave it this really cool "slightly beat up" effect. The TARDIS is a couple thousand years old, after all. But it was extra work we could have avoided if we had just bit the bullet and got the more expensive wood.

The #11 TARDIS is pretty straightforward as far as measurements. On each side, the corner pieces are 4 inches wide. The main trim pieces are also 4 inches. We were able to just use 1 x 4's to make the square panels. A 0.5 x 2 inch strip was ripped to make the trim piece down the center. We did purchase some quarter round trim to run down each side of the corner posts to finish it out nicely.

After the trim was put up on all the sides, the windows were cut out. In this pic, you can also see where I mudded the panels. Again, a lot of work but it did produce a neat effect.

One of our splurges was a good can of Behr exterior paint. Now, everyone knows that the official TARDIS blue is Pantone 2955c. Everyone here in the states also knows that it is almost IMPOSSIBLE to get here. Matt Smith blue best matches to the Behr color Sapphire Lace (in our humble opinion, of course). However, our son wanted more of a David Tennant color. Behr Southern Blue is closer to David Tennant's blue as it has more purple in the color.
Building the light was tough on our budget. Marine lanterns are expensive, y'all. We tried to build one, and honestly ran out of time before we could get it to work. Luckily, we found a lantern at a local store here that wasn't 100% correct but looked enough like David Tennant's top light that we could make it work.

Another splurge we made was on our police box signs. They are acrylic wrapped in black vinyl done by a local company, Infinite Designs. They came out amazing and were worth every penny. For the record, that is our very own Ms. Clara Oswin Oswald checking out the signs.

The first coat of paint! There would be two more of those before we were done. The Behr paint did a great job with awesome coverage. One can was enough, and we still have plenty left over for touch ups.
When we got to this point in the build, we had had a few people ask us if they could use our TARDIS for their pictures. It was then that we decided that we would not be keeping our TARDIS outside where it would get worn down by the weather. We wanted it to stay just like it was! This decision actually made making the top a lot easier.
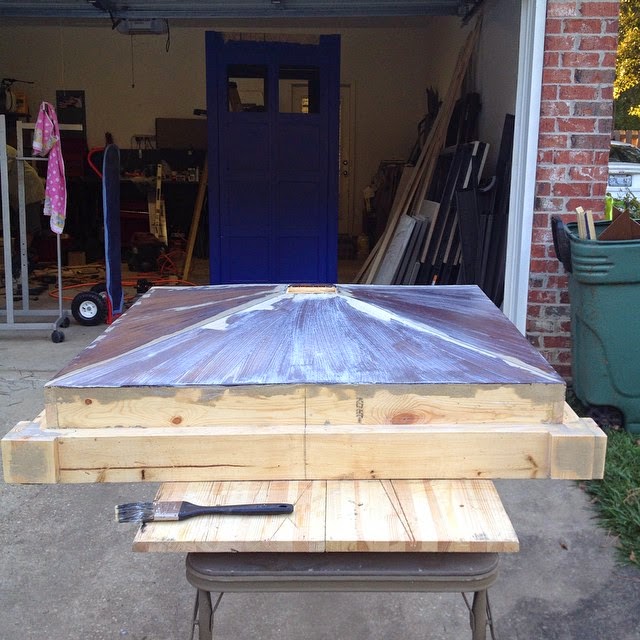
The top. At first we were building the top out of treated plywood because we were putting it outside. Now that we had decided not to do that, we could go with a lighter and less expensive option. The slanted part of the roof is actually pressboard. The frame for the roof is primarily 2 x 4's on the bottom row with 1 x 4's on the top row braced with 1 x 4's. Little 1 x 4 and 1 x 3 blocks on each corner trim out the top of the TARDIS. The hole in the center holds the light in place. We are going to be building a frame around the light that fits down into the center hole. After the mudding was done, the roof was coated with two coats of clear primer. By the way, the main body of the TARDIS was also coated with clear primer.


Final coat of paint. We rolled it outside that day to finish painting. Most TARDIS builds have the part behind the signs open, but ours is closed in and painted white. Again, in the beginning it was supposed to be left outside. We did it this way for stability. Lights were put into the white area to light up the signs.
Incidentally, we also built a huge (around 4.5 x 4.5 feet) furniture mover platform out of scrap wood and an old rug that the TARDIS sits on for us to move it through time and space.

The night before the deadline. And by deadline, I mean our son was taking his pictures the next day. We still needed to get the windows trimmed. Funny story... the morning of picture day, my hubby was trimming out the inside of one of the windows when POP! He drove a nail too close and split one of the pieces of window acrylic. Luckily we have a building supply store not far from our home so he was able to run down and get another one.

We found our door signs on Etsy. The trim around the free for use of public sign is, you guessed it, pieces of scrap wood ripped down into 0.125 thick by 1 inch wide strips. By the way, if you use Gorilla Glue, a little goes a long way. Just saying.
Some cool extras that we added to our custom TARDIS...

It locks. My hubby had an old deadbolt in his junk bucket and used a small block of wood on the inside to catch the locking mechanism. If we want to get into the TARDIS, we have to ask our son for his key.

Another pic of the signs and the lock.

This is really cool. We went back and forth trying to figure out what to do as far as the phone in the box. Vintage phones are hard to find. In the end, we decided to make the phone work. How you ask? We got an old phone base and painted it black and then purchased one of the new retro handsets that plug into a cell phone. My son can put his cell phone behind the base and then plug the handset in, making his phone work. Also, notice the little black box at the top of the phone box. It's a battery operated blue tooth speaker that plays music from my son's cell phone....his Doctor Who Playlist, of course.
Of course, we had to also have round things. We do love the round things.

With the TARDIS done, it was time for his senior portraits.
.jpg)
I love it.
After his senior portraits, we took his TARDIS to the fall festival at our church. My son put on his Matt Smith cosplay, and he and Anna and Elsa prepared to run away through time and space.

So that's our TARDIS building experience. We are going to build the frame for the light (we still have scrap wood), and I am going to go back and paint the round things on the inside instead of using the mirror decals. They don't stick as well after a while.
Total cost for build: $400 to $450
Time spent: Two months but most of that was weekends
Son's face when he saw it finished: PRICELESS
For now, our TARDIS sits in its parking space in our garage, waiting for its next adventure.
Allons-Y!!

If you're still with me, thanks for reading!
No comments:
Post a Comment